

|
|
 |
By the time you read this article I will have surpassed a major milestone in my observing career. Seven years ago (May 1st 2000) I eagerly began an exciting long term observing programme with a very ambitious goal – to search for and discover a new comet. This was a two section programme. The first was the immediate visual sweeping of the western sky with my 8” telescope which took place within the western twilight during those glorious mild May evenings. The second kept me busy on cloudy and moonlit nights - a research programme were I would seek and digest every piece of information I could find on the subject of comets and the sport of comet hunting. Back then there was an interesting statistic which stated that most visual comet discoveries were made after an |
average of 400 hours of hunting. In those days and in the years before, comet hunting was a very competitive sport among amateur astronomers. Not many months or years would pass before the IAU would announce yet another discovery of a new icy wanderer which had been plucked from the sky sporting names like Levy, Bradfield, Machholz or mesmerising triple barrelled Japanese names on the tails of these unexpected transient visitors.
In 2007 things have changed dramatically, with a host of professional automated government funded survey programmes on a mission to protect planet Earth from potentially hazardous asteroids. These metal skinned tireless hunters occasionally turn up new comets making life very difficult for amateur observers which have encouraged the sceptics to loudly announce the death knell for visual discovery. Is this true? The answer is a resounding NO! Although the number of amateur discoveries has reduced in frequency they still occur. Dedicated amateurs have been stepping up the ante by adopting more sophisticated equipment and techniques to beat the professionals at their own game. Many competitive seekers use large aperture telescopes on smart mounts programmed to patrol through specific regions of sky using sensitive CCD cameras complimented by sophisticated software which can identify known and unknown objects without human supervision. At the time of writing, the first amateur comet discovery has been made with a DSLR by Australian Terry Lovejoy (C/2007 E2). This is all very encouraging however what about the visual comet hunters? In October 2006 David H. Levy from Arizona bagged his ninth visual comet discovery (C/2006 T1) with a 16” reflector in the same field as planet Saturn confirming that amateur comet discovery is still alive and well.
After seven years and 1000 hours of visual hunting the search still goes on for me each dark night. As a member of ‘Astronomy Ireland ’ and avid reader of ‘Astronomy & Space Magazine ‘ I decided to celebrate my ten hundred hours of comet seeking by sharing this article with the magazine’s grand membership with the intention of encouraging others to take up the hunt, pursue their dreams and experience the joy of the pursuit of comets.
 |
If you are serious about comet hunting then you will need to use a telescope. I highly recommend a moderate to large aperture Newtonian reflector in the 6” – 16” range on a simple alt-azimuth mount which will allow you to sweep the sky in comfort. Some observers prefer to construct their own instrument specifically for the task with the eyepiece end of the tube designed to manually rotate with the purpose of providing its user with a comfortable eyepiece height from a seated position. Make sure your telescope has a ‘fast’ optical configuration with a focal ration between F/4 and F/6 which when combined with a good quality low power eyepiece will provide you with a wide FOV preferably generating a true field of 1 degree (2 Moon diameters). |
The reason for this it two fold. The wide field will enable you to see a large section of sky at any one moment thus reducing the search time required. The second reason favours your cometary prey which tend to be faint extended objects and diffuse (the boundary between coma and sky is indiscernible) so a large field will increase the contrast between a faint comet and back ground sky.
The would be comet seeker should exercise caution here. If the magnification is too low then comets with small diameter will be completely overlooked or dismissed as stars during a cursory glance. Your eyepiece/telescope combination should be a balance between appropriate magnification and FOV however with a little experimentation you will find what works best for you. Comet discovery statistics have shown that the small aperture instruments are more successful catching the bright twilight comets whereas the large aperture ‘light buckets’ have reigned supreme in regions of sky at larger elongations from the Sun where the fainter comets reside. Much has been written on the subject however there is only one golden rule: the telescope is not important, the dedication of its user IS. This truth is what determines success from failure. The telescope which can be set up outside at a moments notice without much fanfare should be your ultimate choice and for this reason a portable instrument should be considered of paramount importance unless you have access to a back garden observatory to accommodate a larger scope. Note: your search time should always vastly outnumber your set up time and not the other way around.
 |
Visual comet hunting is simplicity in itself and part of the attraction of the sport is that only the very basic of equipment is required to get started. Having said that, I would like to stress the importance of one accessory in particular which EVERY sweeper of the sky should purchase immediately, the ‘Telrad’. In addition to a good optical finder scope the Telrad finder is a 1x reflex device which projects an illuminated bull’s-eye onto a glass plate where the observer can view three red circles of varying size against the starry background. Using this useful aid one can tell exactly where a telescope is pointing in the sky to an accuracy of 0.5 degrees or better. Cross checking the positions of any suspects between telrad and star chart is intuitive, swift and user friendly. Consider the Telrad and other reflex finders on the market today an investment in your time and enjoyment of the sky. |
Another more expensive tool of the comet seekers trade are digital setting circles. Once the two star alignment is complete these useful units can give a continuous digital read out of your telescope’s position in RA and DEC and can identify ‘on site’ any deep sky objects from their vast database of NGC, IC and Messier catalogues. This becomes invaluable when one is sweeping through regions of sky in very bright twilight where there may be few or no bright stars to obtain an accurate position of any suspect found. This luxury can make the difference between discovery and ‘the one that got away’.
Location and light pollution are two important factors for the inspiring comet hunter. The ideal location will permit an unobstructed horizon to the west, north, east and west cardinal points. Comets are often reclusive, they rarely rise to high altitudes and can often be found skirting the horizon for brief periods before plunging into solar glare or fading rapidly. A location which accommodates these requirements would be considered ideal. In practice few of us have this luxury so my advice is to make the most of what you have. Get in the habit of sweeping between and around tree tops and buildings before moving into higher territory and don’t be discouraged by any horizon haze and murk as experience shows that telescopes are surprisingly good at penetrating through the lighter material and after all, not all comets are diffuse. A bright well condensed new comet may be waiting for discovery.
A dark sky is essential so undertake your search on Moon free nights away from artificial lights. A sky with stars visible to magnitude + 6 or more can prove very productive and increase your likelihood of success but if you do have mild light pollution then don’t feel discouraged as not all comets are faint.
In his early years Comet hunter Bill Bradfield discovered a 5th magnitude interloper in the evening twilight! If you do have a bright light source in a particular area then conduct your search in a different region of sky. The infamous Leslie Peltier from Ohio suggests using M97 (The Owl Nebula) in Ursa Major as a suitable test object. If this planetary nebula can be seen with ease then both the telescope and sky are well suited for comet hunting. If light pollution is really a serious problem from your location then you will need to consider driving to a dark site.
 |
Comets are brightest when near the Sun so you should conduct your search within the vicinity of the sunrise and sunset points. Begin your search in the gradually darkening evening twilight at a time when 4th magnitude stars can be seen with the naked eye. Spend between 1 and 3 hours in the western sky beginning with the regions close to the horizon which are about to set then carefully work your way upward into less fertile regions. Repeat the same process again through the eastern pre dawn sky only this time working your way toward the horizon meeting those new constellations emerging out of the morning twilight arch. Approaching dawn and the singing of birds will inform you when to stop. Pay extra attention to the regions of sky within 80 degrees elongation from the Sun particularly along the ecliptic. Sweeping under the pole and along the northern horizon are considered excellent territory and if you can get below – 33 degrees in |
declination then you will avoid overlapping with the professional surveys. Studies have shown that four times as many comets are discovered in the morning sky compared with the corresponding dusk regions so your attention should be focused more intently at this time of the night. Once you have surveyed these comet ‘hay stack’ regions close to the Sun it is strongly encouraged you repeat these a second time toward the end of the current dark period.
 |
A comet search can begin anytime when the Moon is absent from the sky however there are certain periods each month which are of utmost importance. The first takes place after a full Moon when the evening sky is suddenly thrust into darkness before the waning Moon rises again in the east. Here, a bright new comet may be lurking which had previously been cloaked in lunar glare for a week or more. This is a very competitive time and hunters all over the world will be questing through it in search of the ‘Holy Grail’. With each subsequent night the number of hours available for searching increase as the Moon travels eastward along the ecliptic rising later and later each night. |
This short evening window will vary in accordance with the season and the angle of the ecliptic with respect to the horizon. Example: During Spring one can often get a dark window of one hour or more in duration when the Moon is only an astonishing 1 – 2 days after full. You will become familiar with these lunar antics with experience and learn to take advantage of them to get the edge on your competition.
Your pre dawn search should begin in the days before new Moon when the waning crescent has diminished in magnitude enough so that it does not interfere with dark sky observing. This time takes place when the Moon is some 2 days after last quarter phase. It is helpful to know the Moon rise/set times for your location in advance. This information can be obtained from any desktop planetarium software or via the internet. With several years under your comet hunting belt so to speak, this ritual will become obsolete as your own intuition will let you know WHEN to hunt.
The way in which you sweep the sky will largely depend on the design of your telescope’s mount and by what feels natural and comfortable for you. Your goal is to search through a region of sky in a systematic fashion which will allow you time to examine each field carefully without taking so much time that the rotation of the Earth will create gaps in your search net. Very little can be taught in this area except to say that this will give you the chance to express your own individuality by finding what works best for you.
The methodology with which you conduct your search within the first 10 hours of your new comet hunting programme will no doubt be the one which will be with you for the hundreds of hours which will follow. Most comet hunters search the sky in either vertical or horizontal strips in ‘lawn mower’ fashion. Studies have shown that the human eye is more sensitive to faint objects using the vertical method. Spend between 1 and 5 seconds on each field, partially overlap each field with the previous and use averted vision. Tip: as your telescope will be constantly moving and experiencing mild vibration you will find that life will be less frustrating if you focus your telescope for movement rather than stationary dampened stars.
It is better to search a small area thoroughly rather than a large one haphazardly. I visualize a box in the sky using two or more naked eye stars as boundary guides then search within this box covering an area of sky spanning some 600 square degrees. When this box is complete I move east or west of this position and begin sweeping within a new box. Over a number of nights I can cover a large area of comet rich sky and once I am happy with the region covered I will then repeat the boxes throughout the monthly dark period.
 |
The human eye and brain is a marvellous tool but they need to be trained specifically to know what to look for through repetition and experience. Do you really know what a new comet looks like? New comers to this field express surprise when they learn that most new comets are faint objects. The typical comet will sport a visual profile which contrasts sharply with the stereotypical view which most people have of a bright comet with a long flowing tail. (left) Most comets look more like deep sky objects and for this very reason the potential comet discoverer will need to be proficient in the observation and identification of both deep sky objects and faint comets. |
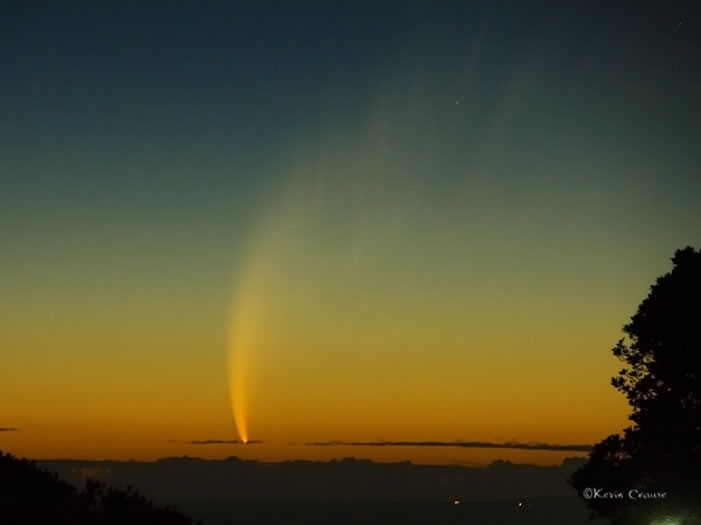
Great comet C/2006 P1 Mc Naught by Kevin Crause
Studying all 110 members of the Messier catalogue will teach you what comets are not. On the other hand following all the comets which come within range of your search instrument will teach what comets DO look like. Most comets at discovery are faint patches of light with diffuse edges and have little or no tail with a typical discovery magnitude of + 10. Get to know your deep sky and get intimate with comets. This will be time very well spent and it will provide you with an enriching visual experience!
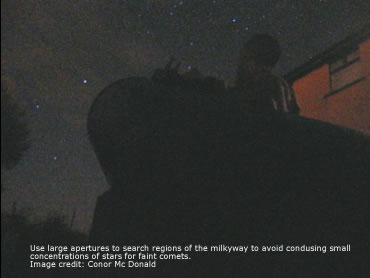
If you are using a telescope with an aperture smaller than 8 inches then you may want to avoid dense regions of the Milky Way. Small concentrations of stars tend to look fuzzy and similar to comets. Also, galaxy rich regions of the sky within Coma Berenices, Virgo and Canes Venatici will be very intimidating as you will be overwhelmed with fuzzy forms which will make accurate identification time consuming and frustrating. The larger the telescope you use then the more you will see however there is a distinct advantage to owning a larger instrument. With greater light gathering power you can confidently identify as many as 90% of these objects as spiral and lenticular galaxies ‘on site’ without the authority of a star atlas.
There will still be objects which need checking, but with experience you will develop the eye to recognise which objects to pass and which will need further scrutiny. Any object which is elliptical or irregular in shape with a surface brightness barely brighter than the background sky should be considered with the utmost of suspicion. An active and predominately gassy comet could very well jump out of the Virgo – Coma cluster due to its vivid blue or green colour. If you are meticulous by nature then you may want to put these dense regions to memory.
 |
Sooner or later you will find a fuzzy object which will set the alarm bells ringing in your head. Control your growing excitement and ask yourself ‘what does this object tell me about itself?’ If your suspect is symmetrical with sharp, well defined edges then chances are it is a galaxy or planetary nebula. Most globular clusters have a mottled appearance and many nebulae and open clusters can reveal their true identity within seconds. The light from a comet is very gradual and soft. |
 |
A cross check with a good star atlas close to hand such as ‘Sky Atlas 2000.0’ or ‘Uranometria’ will identify most but not all objects you will find. If your object is not present on these then you will need to consult online sources for a deeper look. If time is critical then simply sketch the object in relation to background stars and return to the object fifteen minutes later. |
 |
All comets show motion eventually so you should wait until it has moved before pressing any further. If your object remains fixed in the sky after 24 hours then it is not a comet. The detection of comet movement will be dependent on the Earth–Sun-Comet geometry and on the proximity of close field stars. The vast majority of the objects you find will be galaxies and I guarantee that each one will provide you with a sudden thrill and the brief surge of realization of what it must be like to |
discover a new comet. These unexpected thrills and let downs will replenish any dull moments with excitement and surges of adrenalin which will keep you focused and motivated on your primary goal.
Are you sure it is a new comet? Check the Minor Planet Centre’s list of comets to rule out any known objects. Have you confirmed that the comet has moved? Now is the time to record as much information as you can. Make sure you have done all of the following…
Sketch the comet’s position in the Telrad, optical viewfinder and low power eyepiece in relation to background stars.
Plot its position on a star atlas and determine as accurately as you can the RA and DEC in epoch 2000. Record the time of your observation in UT or at least with your own time zone included.
Determine in what direction the comet is moving and its rate of speed. This can be obtained from two accurate positions separated by a short interval of time.
Estimate the comet’s magnitude by using suitable comparison stars at a similar altitude with the comet. Try to be as accurate as you can.
How condensed is the comet? – choose a ‘degree of condensation’ value (D.C) between 0 and 9.
How large is the coma in minutes of arc? What colour is it and is there a central condensation or false nucleus at the centre?
Describe any tail or tails present. Express the length in minutes of arc and position angle (PA) and whether it is of the gas or dust variety.
Make a note of your telescope’s details along with the eyepiece and magnification used.
Ask an observer of high repute or someone you can trust for a visual or photographic confirmation.
Email all of the above information including your personal contact details to the CBAT. Send a second email as back up and if or when the comet gets confirmed it will be named for you via a forth coming IAU circular. Confirmation will be dependant upon weather and Moon phase which can take days or in extreme cases a week or more so do keep following the comet on each night you can.
I wish you every success.
Martin McKenna
* You can read this article in the August 07 edition of 'Astronomy & Space Magazine' whom the article was originally wrote for. If you would like to order a copy then contact 'AI' chairman David Moore through his website.